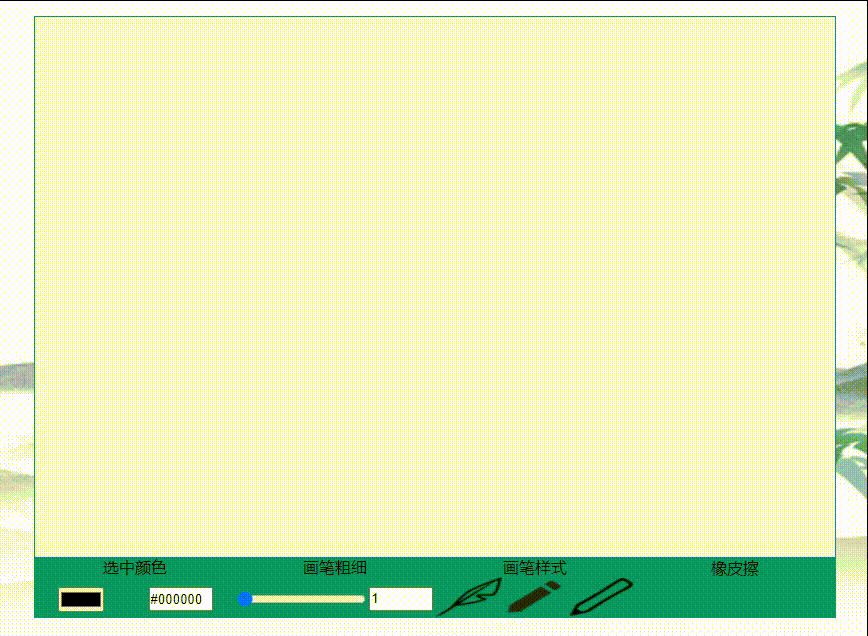
在html5中,新增了很多实用的标签,今天为大家介绍的是html5新增标签,标签是使用来规定一个图形容器(画布),然后通过脚本( JavaScript等)来绘制图形。
今天给大家做一个类似于电脑画图板的功能,我们先来看看效果图:

好了,我们开始上代码
HTML
<div id="box"> <canvas id="canvas" width="800" height="600"></canvas> <dib id="tool"> <div id="pen_color"> <p>选中颜色</p> <div class="btn"> <input type="color" id="color" value="#000000" onchange="colorchange()"> <input type="text" class="num" value="#000000" readonly='readonly' /> </div> </div> <div id="color_thickness"> <p>画笔粗细</p> <div class="btn"> <input type="range" id="range" min="1" max="10" value="1" onchange="change()" /> <input type="text" class="num" value="1" readonly='readonly' /> </div> </div> <div id="color_shape"> <p>画笔样式</p> <ul> <li> <img src="images/0.png"> </li> <li> <img src="images/1.png"> </li> <li> <img src="images/2.png"> </li> </ul> </div> <div id="operation"> 橡皮擦 </div> </dib></div>
CSS
* {margin: 0; padding: 0; list-style: none;}html,body { width: 100%; height: 100%;}#box { width: 100%; height: 100%; background: url(images/pic.jpg) no-repeat; background-size: 100% 100%;}canvas { position: absolute; top: 50%; left: 50%; transform: translate(-50%, -50%); border: #009688 1px solid; background-color: #F9F4F1;}#tool { width: 800px; height: 60px; background-color: red; position: absolute; left: 50%; bottom: 50%; transform: translate(-50%, 300px); display: flex; align-items: center;}#tool>div { width: 25%; height: 100%; background: #009688; text-align: center;}.num { width: 60px; height: 20px; outline: none; background-color: none;}.btn { display: flex; justify-content: space-around; align-items: center; margin-top: 10px;}p { line-height: 20px;}ul { width: 100%; height: 40px; display: flex; justify-content: space-around;}ul li { flex: 1; height: 100%;}#color_shape img { width: 100%; height: 100%; cursor: pointer;}JS
//获取画布以及初始化画布的属性 let canvas = document.getElementById("canvas"); let ctx = canvas.getContext("2d"); // 获取画笔颜色和画笔粗细的显示框 let num = document.querySelectorAll(".num"); // 获取颜色选择器 let Color = document.querySelector("#color") function colorchange() { // 把选择器上面的颜色赋给画笔以及显示框 num[0].value = Color.value; ctx.strokeStyle = num[0].value; //画笔的颜色 } // 获取画笔粗细的滚动条 let Range = document.querySelector("#range"); function change() { // 把画笔粗细选择器上的值赋给画笔以及显示框 num[1].value = Range.value; ctx.lineWidth = num[1].value; //画笔的线宽也就是画笔的粗细 } //是否开始绘制 let isDraw = false; //鼠标按下去 // 获取画笔的样式 let pen = null; let oLi = document.querySelectorAll("li"); for (let i = 0; i < oLi.length; i++) { oLi[i].onclick = function() { pen = canvas.style.cursor; pen = "url(./" + i + ".png),auto"; } } canvas.onmousedown = function(event) { //鼠标按下去就说明开始绘图了,true isDraw = true; //起始一条路径,或重置当前路径。 ctx.beginPath(); this.style.cursor = pen; } //鼠标按移动 canvas.onmousemove = function(event) { // txt.innerHTML = "鼠标移动 X:"+event.offsetX+" Y:"+event.offsetY; //isDraw为true说明鼠标按下去了开始允许绘图 //isDraw为false说明鼠标抬起来,绘图结束。 if (isDraw) { //鼠标在画布上x轴的位置,因为这个点击事件是在画布上。 //所以指的是在画布上的鼠标位置,不会显示鼠标离窗口的位置。 let x = event.offsetX; //鼠标在画布上y轴的距离。 let y = event.offsetY; //开始画线,每次鼠标移动x,y都会边。 所以鼠标移动到那里坐标就传进去,在那个位置就会画个点(无数的点连起来就是一条线) ctx.lineTo(x, y) //绘制已定义的路径。 ctx.stroke(); } } //鼠标抬起来 document.onmouseup = function() { //鼠标抬起来了,绘图结束 isDraw = false; canvas.style.cursor = ""; }功能展示
好了全部的代码就这样完成了,当你熟悉了canvas后也可以做的更加炫酷
点我看效果
原文转载:http://www.shaoqun.com/a/484531.html
自贸区跨境通网站:https://www.ikjzd.com/w/1329
bestbuy:https://www.ikjzd.com/w/394
krazy:https://www.ikjzd.com/w/1801
在html5中,新增了很多实用的标签,今天为大家介绍的是html5新增标签,标签是使用来规定一个图形容器(画布),然后通过脚本(JavaScript等)来绘制图形。今天给大家做一个类似于电脑画图板的功能,我们先来看看效果图:好了,我们开始上代码HTML<divid="box"><canvasid="canvas"width="80
naver:https://www.ikjzd.com/w/1727
海淘贝:https://www.ikjzd.com/w/1726
Guaranteed Delivery:https://www.ikjzd.com/w/509
【到欧洲旅游穿什么合适】——去欧洲旅游穿什么好:http://tour.shaoqun.com/a/27477.html
稻城亚丁购物指南(图) - :http://tour.shaoqun.com/a/14067.html
没有评论:
发表评论